3 of 4: Escaping Vendor Lock-in Jail (How Kubernetes Set Us Free)
This article is one of four (4) in a series:
1 of 4: Escaping Vendor Lock-in Jail (How Kubernetes Set Us Free)
In part 1, you will set up the Kubernetes Cluster on Amazon Elastic Kubernetes Service (EKS).
2 of 4: Escaping Vendor Lock-in Jail (How Kubernetes Set Us Free)
In part 2, you will install an AWS Application Load Balancer.
3 of 4: Escaping Vendor Lock-in Jail (How Kubernetes Set Us Free)
In part 3, you will use Kubernetes to deploy the HumanGov application for California.
4 of 4: Escaping Vendor Lock-in Jail (How Kubernetes Set Us Free)
In part 4, you will use Amazon Route 53 to name the application and AWS Certificate Manager to secure access to the application. You will also use Kubernetes to deploy ingress controller, so that Internet users can connect to the application. After testing, you will decommission the infrastructure.
For background on this series, go here:
Escaping Vendor Lock-in Jail (How Kubernetes Set Us Free) | A Four-Part Series
Prequisite 1 of 1. Create Role & Service Account for Cluster to S3 and DynamoDB tables
eksctl create iamserviceaccount \
  --cluster=humangov-cluster \
  --name=humangov-pod-execution-role \
  --role-name HumanGovPodExecutionRole \
  --attach-policy-arn=arn:aws:iam::aws:policy/AmazonS3FullAccess \
  --attach-policy-arn=arn:aws:iam::aws:policy/AmazonDynamoDBFullAccess \
  --region us-east-1 \
  --approve

1 of 8. [Cloud9]
Get to the application directory
cd human-gov-application/src

2 of 8. [Cloud9] Create a container repository and get the push comamnds
Amazon Elastic Container Registry -/- Public Registry -/- Repositories -/- [Create repository]
General settings -/- Visibility settings: Public
Detail -/- Repository name: humangov-app
[Create repository]
humangov-app -/- [View push commands]


3 of 8. [Cloud9] Authentication to Registry.
Retrieve an authentication token then authenticate your Docker client to your public Elastic Container Registry (ECR)
This, and subsequent commands were sourced from the 'push commands'
aws ecr-public get-login-password --region us-east-1 | docker login --username AWS --password-stdin public.ecr.aws/i7y0m4q9

4 of 8. [Cloud9] Build Docker image.
For information on building a Docker file from scratch see the instructions here . You can skip this step if your image is already built:
docker build -t humangov-app .

5 of 8 . [Cloud9] Tag the image.
docker tag humangov-app:latest public.ecr.aws/i7y0m4q9/humangov-app:latest

6 of 8. [Cloud9] Push image to repository.
docker push public.ecr.aws/i7y0m4q9/humangov-app:latest

7 of 8. [Cloud9] Create humangov-california.yaml
Place the file under the human-gov-application/src directory.
Note: image and bucket value should match your own resource names
apiVersion: apps/v1
kind: Deployment
metadata:
  name: humangov-python-app-california
spec:
  replicas: 1
  selector:
    matchLabels:
      app: humangov-python-app-california
  template:
    metadata:
      labels:
        app: humangov-python-app-california
    spec:
      serviceAccountName: humangov-pod-execution-role
      containers:
      - name: humangov-python-app-california
        image: public.ecr.aws/i7y0m4q9/humangov-app:latest
        env:
        - name: AWS_BUCKET
          value: "humangov-california-s3-zsmb"
        - name: AWS_DYNAMODB_TABLE
          value: "humangov-california-dynamodb"
        - name: AWS_REGION
          value: "us-east-1"
        - name: US_STATE
          value: "california"

---

apiVersion: v1
kind: Service
metadata:
  name: humangov-python-app-service-california
spec:
  type: ClusterIP
  selector:
    app: humangov-python-app-california
  ports:
    - protocol: TCP
      port: 8000
      targetPort: 8000

---

apiVersion: apps/v1
kind: Deployment
metadata:
  name: humangov-nginx-reverse-proxy-california
spec:
  replicas: 1
  selector:
    matchLabels:
      app: humangov-nginx-reverse-proxy-california
  template:
    metadata:
      labels:
        app: humangov-nginx-reverse-proxy-california
    spec:
      containers:
      - name: humangov-nginx-reverse-proxy-california
        image: nginx:alpine
        ports:
        - containerPort: 80
        volumeMounts:
        - name: humangov-nginx-config-california-vol
          mountPath: /etc/nginx/
      volumes:
      - name: humangov-nginx-config-california-vol
        configMap:
          name: humangov-nginx-config-california

---

apiVersion: v1
kind: Service
metadata:
  name: humangov-nginx-service-california
spec:
  selector:
    app: humangov-nginx-reverse-proxy-california
  ports:
    - protocol: TCP
      port: 80
      targetPort: 80

---

apiVersion: v1
kind: ConfigMap
metadata:
  name: humangov-nginx-config-california
data:
  nginx.conf: |

    events {
      worker_connections 1024;
    }

    http {

      server {
        listen 80;

        location / {
          proxy_set_header Host $host;
          proxy_set_header X-Real-IP $remote_addr;
          proxy_set_header X-Forwarded-For $proxy_add_x_forwarded_for;
          proxy_pass http://humangov-python-app-service-california:8000; # App container
        }
      }
    }

  proxy_params: |
    proxy_set_header Host $host;
    proxy_set_header X-Real-IP $remote_addr;
    proxy_set_header X-Forwarded-For $proxy_add_x_forwarded_for;


---------------

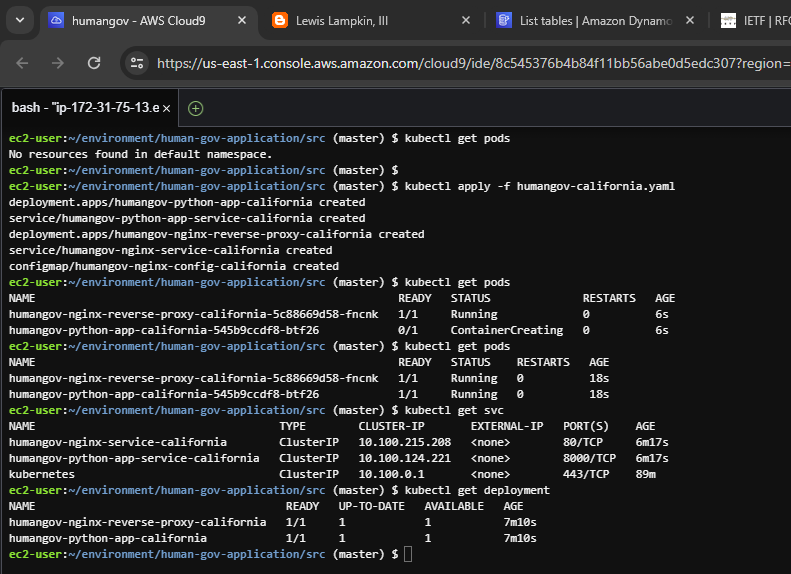
8 of 8. [Cloud9] Apply the humangov-california.yaml
kubectl get pods

kubectl apply -f humangov-california.yaml

kubectl get pods
kubectl get svc
kubectl get deployment
References
Container Registry - Amazon Elastic Container Registry (Amazon ECR) - AWS
get-login-password — AWS CLI 1.32.53 Command Reference
docker image tag | Docker Docs
IAM Roles for Service Accounts - eksctl
kubectl Quick Reference | Kubernetes


Comments
Post a Comment